Be yourself; Everyone else is already taken.
— Oscar Wilde.
This is the first post on my new blog. I’m just getting this new blog going, so stay tuned for more. Subscribe below to get notified when I post new updates.
Be yourself; Everyone else is already taken.
— Oscar Wilde.
This is the first post on my new blog. I’m just getting this new blog going, so stay tuned for more. Subscribe below to get notified when I post new updates.
Now that we understand the main components of Angular, lets talk functionality. We will be creating a new component, this one will be for having the date and time appear on a page.
Create a new component called date-time (ng generate date-time). Once thats created, go into the date-time.component.ts file and add the following code.
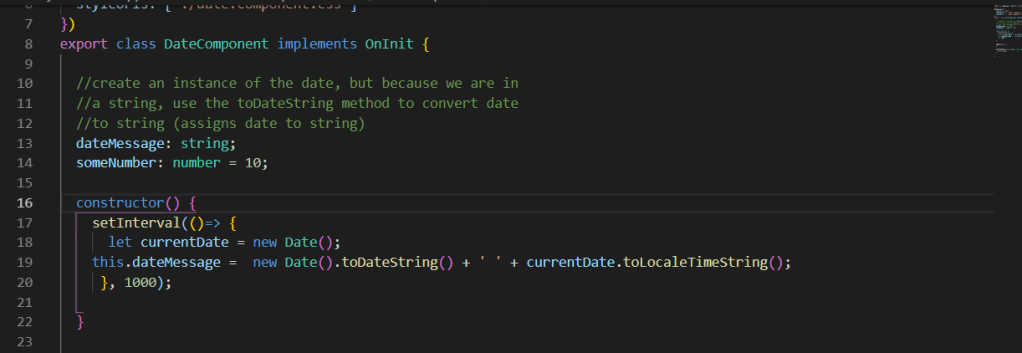
What we’re doing here is, after exporting the class, we create a variable String called dateMessage. Inside the constructor, create another Date variable. We will use the setInterval method to keep the time updated, and the string dateMessage will show the current date, along with the local time (counting every second).
We have the logic set, but we need the logic to appear on the html. In the date-time.component.html, we need to find a way to pass the dateMessage variable to the html page. We can achieve this by using {{ }}.
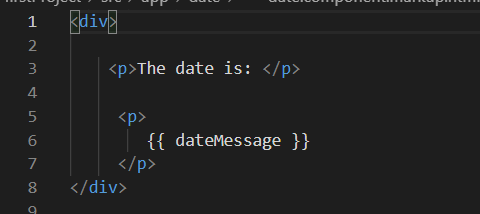
The double curly brackets is the main way in Angular to achieve one way data binding. The double curly brackets lets Angular know that what we are passing through is a variable, it will then look for that variable and plug it into our page.
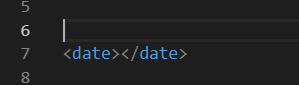
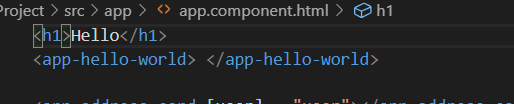
We’re not finished yet, we have the html and typescript ready for our date-time page, but we still need to add the page to our app.component.html file (remember what the name of the selector was)
Now we have an idea of basic functionality in Angular. In the next post, I will briefly cover some special Angular functions!
So how does Angular work? Whats the structure of Angular? To better show this, lets create a new folder. On the command line (make sure youre in the project directory) type ng generate hello-world. This command will generate a new component for us.
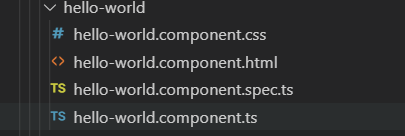
Angular automatically creates this folder with these files included once we run the command. This file is made up of an html file, a css file, a typescript file, and a test typescript file.
Through the typescript named hello-world.component.ts file, Angular packages these files together in the same Component, then exports those components into a class.

As we can see, this .ts file contains the css and the html for hello-world. They are packaged together with the @Component tag, signifying to Angular that these are components.
Components are the basis for how angular works. Angular will divide your website up based on components that you create (you get to decide how your page is divided up) but angular takes care of the rest. For example, every website has a header, footer, and possibly a sidebar. In Angular, you treat each different part of the site as a component. And sometimes, those components could have components inside of them, allowing for lots of customization.
Back to the project, just because we created this new component doesnt mean itll show up on the site. Thats what the app.component.html file is for. The app.component.html file acts as the “main” html file where everything will get stored. Its really simple to implement too! On the hello-world.component.ts file we see a variable called selector: app-hello-world. This acts as a name for this whole component, that way Angular knows if we use this particular tag, we are referring to this component.
All you have to do is add that tag to the app.component.html file and there, you added the hello-world component to your website!
This post was meant to just break down the basic structure of Angular and give a brief overview of component and how they work. The next post will be going over some simple functionality to an Angular application.
In this post, I will demonstrate how to set up Angular and create a simple web application.
The very first step you need to do is make sure you have node.js installed. To check to see if you have it, open up command prompt and type npm -v

If its not installed, just type in npm install -g (this will make node.js install globally on your machine, if not you would have to install node.js on every new application you create)
If you dont already, download Visual Studio Code (this is just my preferred IDE and its pretty easy to use Angular with) –> https://code.visualstudio.com/download
Next is the most important step. We will be installing the Angular CLI (Command Line Interface). The Angular CLI makes creating applications from the command line much easier. Its a command line tool that provides us the boilerplate templates code. Basically, it saves us a lot of time by providing code thats already packed in. On the command line, type npm install -g @angular/cli

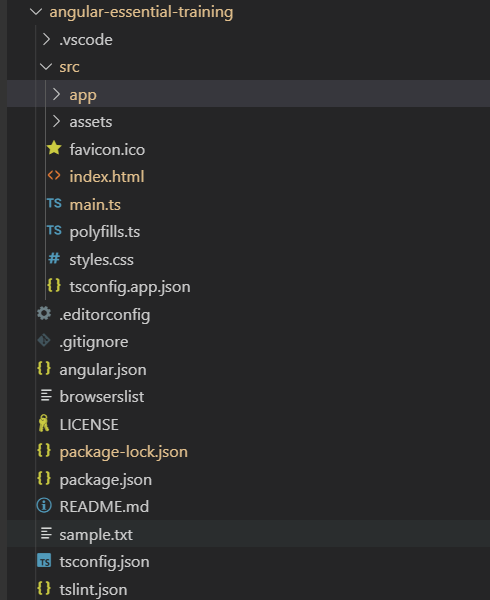
Once the CLI has installed, we can go ahead and create our first project! On command line, type ng new first-project. This will create a project “First Project”. Once created, navigate into the directory of that project. Once in, type ng-serve, this will make the serve for the website go online and compile successfully. This is what your file should look like (in VS Code)

The last thing to do is test out the page. On your web browser, type in localhost:4200, an Angular test page should pop up, meaning you have successfully created your own SPA. (This page is auto generated by Angular, and can be found in src –> app –> app.component.html) Feel free to play around with the html files for the Angular test page, it will update live!

In the next post, I will break down the structure of these files and explain what the src –> app file contains.

This topic will act as an introduction to Angular (as Im still currently learning how it works). But to simplify it, Angular is Javascript front-end framework for web development. Its maintained by none other than Google, and its one of the most popular Java frameworks to come out. The official site has tons of documentation to go over thats very useful and easy to read!
( –> https://angular.io/ <–)
So what makes Angular different from other Javascript frameworks (because theres NEVER enough Javascript frameworks 😐 )

Well for one, Angular is always up to date thanks to Google! But more importantly, it makes web development much easier! It has cross platform capabilities (desktop, web, and mobile), it auto generates majority of the templates you need, it integrates dependency injection and declarative templates, and its easy to test.
Now, Angular is best suited for any Single Page Application (SPA) development, since it provides ready-to-use modules that make building components for a SPA easier to manipulate and control.
As I said, this post is to act more as an introduction into what Angular is. I highly recommend checking out this video ( https://www.youtube.com/watch?v=8sC55WKzJW4 ) for more reference into what Angular is. Next post, I will demonstrate how to properly install and start to use Angular.
Strategy is great for run time polymorphism, because thats essentially what it is! We are taking a group of algorithms and changing their behavior when they are called. This gives the user plenty of options on whether or not a class will behave a certain way.
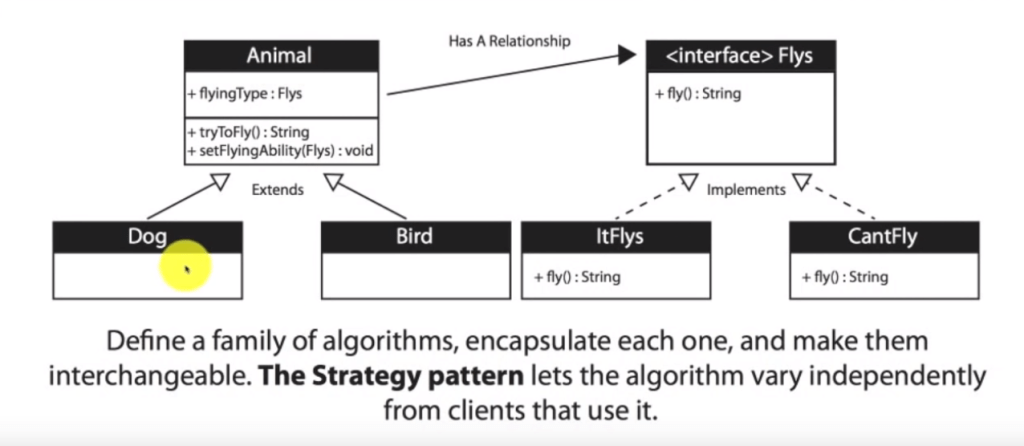
This UML (taken from Derrick Bansas’s video: ( https://www.youtube.com/watch?v=-NCgRD9-C6o&list=PLF206E906175C7E07&index=3 ) does a great job of clarifying why to use the strategy method.
In this flow chart, we can see that class animal has a relationship with class flys. We want this because instead of adding a fly method to every new instance of animal, animal will have an instance of a fly interface, with classes itFlys and CantFly being part of the interface. From there, we can decide what does fly and what doesnt, allowing for more dynamic use of the fly class. For instance, if the bird couldnt fly anymore for some reason, but the dog can, we can change those variables without re structuring the code for animal, dog, or bird.
Follow more on my github for a demonstration of the strategy method: https://github.com/dmurtagh14/StrategyDesignPattern
When creating classes, it can be a lot to build each class hand by hand, line by line. Its too much code, too messy, and there are better methods to approach the creation of many different object. Enter the Factory Design Pattern. This pattern is the solution to the creation of many objects.
By definition: ” The Factory method defines an interface for creating an object, but let’s the classes that implement the interface decide which class to instantiate. The Factory method lets a class defer instantiation to subclasses. ” ( https://www.binpress.com/factory-design-pattern/ )
What this means is that we can create an interface thats sole purpose is to define what objects are being created, like a factory! You specify to the factory what you want, and the factory will build it for you, its easy!
To get a better understanding here is a UML diagram of the factory method

And here is a link to my github project on Factory methods: https://github.com/dmurtagh14/FactoryDesignPattern
In which I follow this tutorial: https://www.youtube.com/watch?v=ub0DXaeV6hA&list=PLF206E906175C7E07&index=5
In databases, we want to uniquely identify a certain attribute so when we pull information off the database, we only need to see that one attribute to get all the information we need. In this case, the unique attribute of a database is know as the primary key. Primary keys must have no null values or any repeating values.
The best example I like to think of for primary keys are ID numbers.
Foreign Keys are references to primary keys in other tables. Its used as a way to link up 2 or more tables together.
Have you ever worked on a bit of code that was really messy and you needed a break from it? You dont want to delete all the progress you made but you cant upload the work on git hub because its either unfinished or problematic. So what can you do? Imagine if there was a way you could temporarily save your work without it affecting the original code, kind of like a draft. Well, you can! Thanks to git stash
You start a stash by using the command git stash
git stash will store whatever progress you made prior to your last commit into a stack, and revert back to the original commit, essentially saving your work as a draft.
You can apply changes to a git stash by using the command git stash {index no.} apply. This will recreate whatever index no. you saved in that git stash. Once you make all the necessary changes you need, you can use git commit to save those changes and push to finalize the code.
You can delete stashes by using git stash drop {index no.}. If you dont specify an index number, drop will delete the first stash saved.
For more information check out the official git documentation on stashing!
Its that time again, where we go over some more java interview questions! Same as before, questions and answers will be posted here.
By default, package private is the modifier. There is no explicit modifier for package private. If a class has no modifier (the default, also known as package-private), it is visible only within its own package.
2. Can you change the contents of a final array? Can you give an example?
Yes you can! However, you need to be careful with how you change the contents since they’re is a right way and a wrong way of doing it. Take the following code for example.
final int[] array = new int [5]
array = new int[10];
This is the wrong way of changing the contents. As oppose to changing the actual content within the array, you are changing the location of memory for this variable using the keyword new. This throws an array because you cannot change the location of memory of a final variable. Instead, what you would want to do is this.
public class FinalArrayExample {
  final int[] array = new int[5];

  // allowed
  void changeArrayContents(int i, int val) {
    array[i] = val;
  }
This code will compile because instead of changing the location in memory by creating a new location, we are instead in the same location of memory, only changing the content from within that memory location, which is permitted by final variables.
3. What are a few ways you can improve the memory footprint of a Java application?
Improving the amount of memory used is vital in software engineering and here are a few things you can do to improve the amount of memory your application is using and prevent memory leaks.
3. What is a Singleton class and what is one of the best ways to implement a Singleton class?
By definition, the singleton is a design pattern in which you only use a single instance of a class. It restricts the instantiation of a class to one object. In singleton classes, you use a getinstance() method instead of a constructor. Also as a general practice, us class name as method name while defining a method. Written below is how we create the singleton class.
// Java program implementing Singleton class
// with getInstance() method
class Singleton
{
    // static variable single_instance of type Singleton
    private static Singleton single_instance = null;

    // variable of type String
    public String s;

    // private constructor restricted to this class itself
    private Singleton()
    {
        s = "Hello I am a string part of Singleton class";
    }

    // static method to create instance of Singleton class
    public static Singleton getInstance()
    {
        if (single_instance == null)
            single_instance = new Singleton();

        return single_instance;
    }
}
We start off by creating a class, and that class will contain a private static variable of that class type. We will assign this variable null for now, but will be using it as part of the getInstance() method.
 // static variable single_instance of type Singleton
    private static Singleton single_instance = null;
We will then create a public variable (String in this case) and create a private constructor to initialize that variable.
 // variable of type String
    public String s;

    // private constructor restricted to this class itself
    private Singleton()
    {
        s = "Hello I am a string part of Singleton class";
    }
Then we create a static method for the getInstance(), this will act as the “constructor” for the singleton class to create the instance of singleton class.
 // static method to create instance of Singleton class
    public static Singleton getInstance()
    {
        if (single_instance == null)
            single_instance = new Singleton();

        return single_instance;
    }
This is everything we need for the singleton class, now we throw everything into the main method and output by instantiating the singleton class.
class Main
{
public static void main(String args[])
{
// instantiating Singleton class with variable x
Singleton x = Singleton.getInstance();
// instantiating Singleton class with variable y
Singleton y = Singleton.getInstance();
// instantiating Singleton class with variable z
Singleton z = Singleton.getInstance();
// changing variable of instance x
x.s = (x.s).toUpperCase();
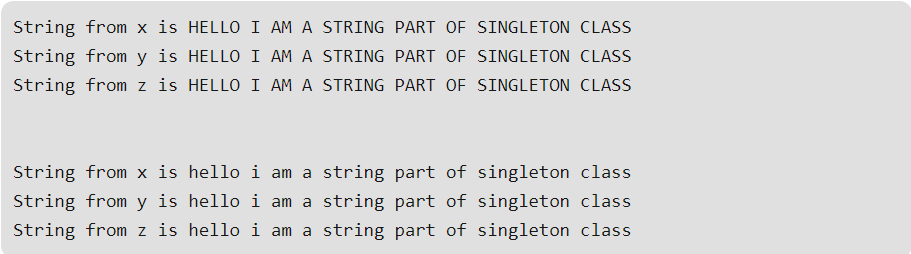
System.out.println("String from x is " + x.s);
System.out.println("String from y is " + y.s);
System.out.println("String from z is " + z.s);
System.out.println("\n");
// changing variable of instance z
z.s = (z.s).toLowerCase();
System.out.println("String from x is " + x.s);
System.out.println("String from y is " + y.s);
System.out.println("String from z is " + z.s);
}
}
The following will ouput
In the Singleton class, when we call getInstance() method for the first time, it creates an object of the class with name single_instance and return it to the variable. Since single_instance is static, it is changed from null to some object. Next time, if we try to call getInstance() method, since single_instance is not null, it is returned to the variable, instead of instantiating the Singleton class again.
One of the best ways to implement a singleton class is to use an enum type because Java ensures that only a single instance of an enum is ever created, the singleton class implemented via enums is safe from reflection and serialization attacks. Heres an example
class Demonstration {
    public static void main( String args[] ) {
        Superman superman = Superman.INSTANCE;
        superman.fly();
    }
}

enum Superman {
    INSTANCE;

    private final String name = "Clark Kent";
    private String residence = "USA";

    public void fly() {
        System.out.println("I am flyyyyinggggg ...");
    }
}
Citation for code/references: https://www.geeksforgeeks.org/singleton-class-java/
When talking about Abstract classes VS. Interface classes, things can admittedly become confusing. On the surface level, it seems as if they both do exactly the same thing without any differences. However, there are plenty of key differences between the two.
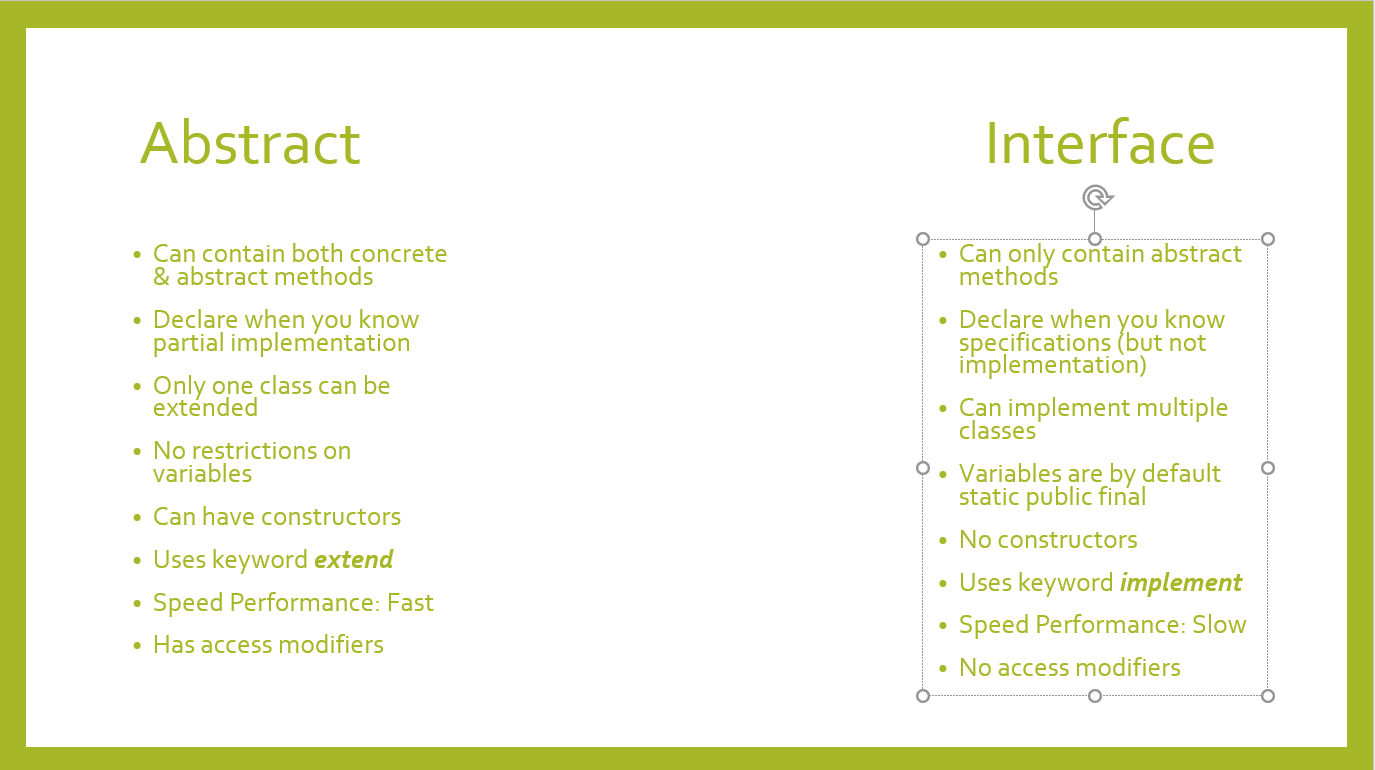
One of the key differences between Abstract & Interface classes is how they are used. Abstract classes should be used when you know partial implementation of a class AND specifications for that class. In essence, you use Abstract when you want to implement a method, but dont know all of the methods that are used. Abstract classes are created using the keyword abstract, and used with the keyword extends. This keyword is used because the abstract class will act as an extension to the class using it, and taking in the concrete methods that are made within the abstract class.
The Interface differs because it has no concrete methods inside of it, essentially acting as an empty class that passes through empty methods. The keyword interface is used to create the interface, and implements is used. Interfaces are used when you know what the specifications are, but you dont know how to implement the methods in said classes.
